

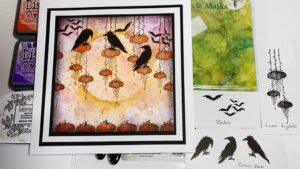
Welcome to the Magical Hanging Pumpkin Patch by Rosemary Rogers
Three crows are sitting on the hanging pumpkins in the evening sunset, waiting for their bat friends to arrive, so they can begin their Halloween extravaganza. The Products Used Luna lights Crow set Bats Inks and items needed for project. Distress Oxide. Wilted Violet and Crackling fire. Versafine Onyx Black. Gelly roll pens clear. Orange […]
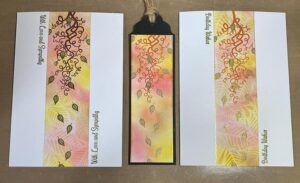
Whimsical Whisps and Falling Leaves by Rosemary Rogers
Today, design team member, Rosemary, shows us her take of this month’s Creative Challenge theme “Falling Leaves”. The Products Used Whimsical Whisps Whimsical Whisps SmallFlurry stencilHeratfelt stamp versesMultifarious CardGold gel penDistress Oxide ink- Fired brick Distress Oxide ink- Mustard SeedDistress Oxide ink- Worn LipstickDistress Oxide ink- Spiced MarmaladeVersafine ‘Clair’ Ink- Shady LaneVersafine ‘Clair’ Ink- AcornMica […]
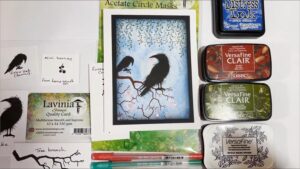
Drake Feeding the Baby Crow by Rosemary Rogers
Today, design team member Rosemary demonstrates how she created this lovely card featuring our magnificent crow, Drake, along with one of the smaller crows from the Crow Set. The Products Used Multifarious Card DrakeCrow SetMini BerriesForest CreeperTree BranchAcrylic boardAcetate Circle Masks Distress Ink Prize RibbonVersafine ‘Clair’ Ink- AcornVersafine ‘Clair’ Ink- Shady LaneVersafine ‘Clair’ Ink- NocturneSpray […]
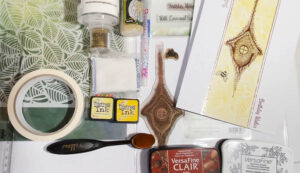
Fairy Hive Birthday Wishes by Rosemary Rogers
Today, Lavinia Design Team member, Rosemary, shares how she created this lovely birthday card using our Fairy Hive and Bee stamps. In addition to the products listed below, I find these general craft supplies are always handy to have to hand: Craft mat, stamping mat, paper trimmer, heat gun, damp and wet cloth to clean […]
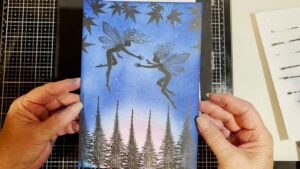
Leyla and Wren Dancing in the Midnight Sky by Rosemary Rogers
Hello, it’s Rosemary here, from the Lavinia Design Team. Today I would like to share with you a card I made to promote a recent Creative Challenge, Midnight Magic. Hope you enjoy it The Products Used LeylaWrenFairy Fir TreeMaple LeafDistress ink.Blueprint sketchSalty ocean. Faded jeansChipped SapphireWorn lipstickVersafine onyx black. Gelly roll pens goldmultifarious card A5Acrylic […]

Wallace Searching for Blackberries by Rosemary Rogers
Design Team member Rosemary Rogers brings us this delightful card featuring one of the cute little hedgehogs from our “Wallace Family” set, together with our Bramble and Blackberry stamps. The Products Used One stamp from the Wallace Family Blackberry stamp Bramble Butterfly Versafine Clair Ink Distress Oxides
