Skip to content
Login
Wish List
Trade
Checkout
Search for:
Search Button
Choose a Currency
GBP (£)
AUD ($)
USD ($)
EUR (€)
CAD ($)
NZD ($)
Reset
£
0.00
Cart
£
0.00
0
Basket
Home
About
Craft Store
Inspiration
Events
Gift Vouchers
Contact
Gifts & Home
The Dreamatorium
Find out more about us
About us
Meet the team
Stamps
Colour
Embellish
Card and Paper
Crafting
Tools and Accessories
Downloads
Categories
Fairies
Creatures
Flora
Mystical
Objects and Landscapes
Words and Verses
Mini Stamps
Trees
Themed Collections
Winter
Halloween
Ocean
New Collection
Entire Collection by Date
Printable Stamps List
Ink Pads
Elements
Distress Oxide
Ranger Archival
Versafine Clair
Versamark
Inks and Dyes
Brusho
Dinkles
Mica Spray
Alcohol Ink
PanPastel
Paints
Acrylic Spray
Metallic Paint
Acrylic Paint
Watercolour
Stencils and Masks
Stencils
Masks
Sticker Stencils
Glitter and Shimmer
Glitter
Shimmer
Mica Mineral
Stickles
Liquid Pearls
Emboss
WOW! Powder
Foils and Gilding
Polishes
Decorate
Pens
Pencils
Stickers and Tape
Mediums
Pre Printed
Dreamscape Papers
Scene-Scapes
Calendar
Blank
Multifarious Card
Watercolour Card
Coloured Card
Blank Cards and Envelopes
Specialist Paper
Art Stationary
Pads and Books
Special Print Media
Blanks and Bases
ArtBord
MDF Bases
Greyboard
Polystyrene
Craft Accessories
Haberdashery
Bits'n'Bobs
Chocolates
Kits
Bauble Kits
Lamp Kits
Jewellery Kits
Fairy Dream Catchers
Needlecraft Kits
Tools
Applicators
Gadgets
Acrylic Boards
Brushes
Gel Press
Accessories
Storage and Containers
Palettes
Craft Mat
Aprons
Stick and Fix
Resists and Finishes
Glue and Adhesive
Digital Art
Bauble Downloads
Black & White Downloads
Working with PDF Files
Cutting Files
Cutting File Downloads
Working with Cutting Files
Stamps
Categories
Fairies
Creatures
Flora
Mystical
Objects and Landscapes
Words and Verses
Mini Stamps
Trees
Themed Collections
Winter
Halloween
Ocean
New Collection
Entire Collection by Date
Printable Stamps List
Colour
Ink Pads
Elements
Distress Oxide
Ranger Archival
Versafine Clair
Versamark
Inks and Dyes
Brusho
Dinkles
Mica Spray
Alcohol Ink
PanPastel
Paints
Acrylic Spray
Metallic Paint
Acrylic Paint
Watercolour
Embellish
Stencils and Masks
Stencils
Masks
Sticker Stencils
Glitter and Shimmer
Glitter
Shimmer
Mica Mineral
Stickles
Liquid Pearls
Emboss
WOW! Powder
Foils and Gilding
Polishes
Decorate
Pens
Pencils
Stickers and Tape
Mediums
Card and Paper
Pre Printed
Dreamscape Papers
Scene-Scapes
Calendar
Blank
Multifarious Card
Watercolour Card
Coloured Card
Blank Cards and Envelopes
Specialist Paper
Art Stationary
Pads and Books
Special Print Media
Crafting
Blanks and Bases
ArtBord
MDF Bases
Greyboard
Polystyrene
Craft Accessories
Haberdashery
Bits'n'Bobs
Chocolates
Kits
Bauble Kits
Lamp Kits
Jewellery Kits
Fairy Dream Catchers
Needlecraft Kits
Tools & Accessories
Tools
Applicators
Gadgets
Acrylic Boards
Brushes
Gel Press
Accessories
Storage and Containers
Palettes
Craft Mat
Aprons
Stick and Fix
Resists and Finishes
Glue and Adhesive
Downloads
Digital Art
Bauble Downloads
Black & White Downloads
Working with PDF Files
Cutting Files
Cutting File Downloads
Working with Cutting Files
Get inspired
Video Tutorials
Step by Step Tutorials
Quick Crafts
Creative Challenge
Meet the creative team
Our Recent Video Tutorials
Texture Paste Stencilling Technique by Tracey Dutton
Watch Tutorial
Home Is Where the Heart Is by Tracey Dutton
Watch Tutorial
Contact Us
Newsletter Signup
Search our site
Choose a Currency
GBP
AUD
USD
EUR
CAD
NZD
Pen
Heart
Shopping-bag
Make a Parchment Fairy Lantern
April 6, 2021
Prev
Previous
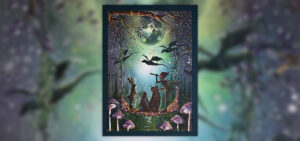
The Owl and the Rabbit by Rosemary Rogers
Next
Lilium Flower card and tag by Rosemary Rogers
Next
Explore
More Step by Step Tutorials
Take a look at some more of our step by step tutorials.
Christmas Tree Hanging decoration by Tina Ashton
Read More »
April 14, 2024
Star Gazing a Picture Tutorial by Mona Hauge
Read More »
April 7, 2024
Hallowe’en Meeting Picture Tutorial by Katarina Eliasson
Read More »
March 18, 2024