Doodle on a Stenciled Background by Angelique
Hello lovely people,
I got so many questions on how I created my ‚doodled on stencilled background‘ cards, I have made a short step by step for you.
Have a go, it’s easy and it’s fun, and it stretches the use of the lovely Lavinia stencils.
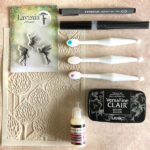
The Products used…
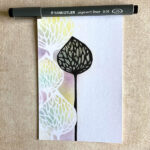
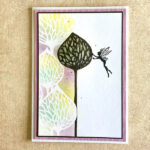
A Lavinia stencil of your choice, I chose pods.
A Lavinia stamp of your choice, I chose one of the three dancing fairies.
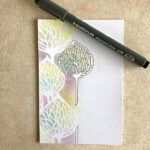
A black ink pen. I use a 0.05 Steadler pen, because it‘s waterproof when dry.
A selection of Element inks for blending. I chose pale purple, light blue and bright yellow.
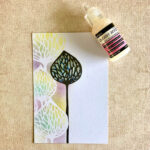
Glossy Accents, clear sparkle pen or glitter or any sparkles to embellish.
A white card panel, I worked on a panel A6 size, of 300 gsm card.
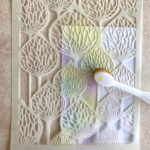
The Steps in creating the card
(click on the first image to view as a slideshow)
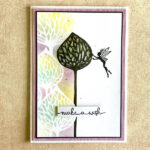
- The items I used
- With a brush or blending tool, brush the inks on to the card panel. I left about half of the panel white.
- Take the ink pen and outline the shape of the pod you want to stand out. Just follow the lines of the stencil
- With the same pen (or a broader nib, if that‘s easier) colour in the outlines and draw lines in the leaf shapes. You can choose any shape or form of lines, zentangle, anything you like.
- When the ink is completely dry, add some glossy accents to create some dimension and let dry.
- Stamp the fairy, or any other Lavinia stamp of your choice, to complete the scene, using Versafine Clair Nocturne. Add dots to make it look more magical, using the ink pen (a black Posca pen would be fine too). I added white dots too, using a white 0.8 gel pen. This would be the time to add any glitter, sparkles or embellishments you wish to use.
- When dry, the panel is ready to be matted on to a white cardbase. I chose black and pale purple card, to match the inks I used.
- You can leave as is, or add a sentiment strip as I did. The sentiment is stamped with the Versafine Clair Nocturne.
Done!
Hope you enjoyed this, can’t wait to see your creations.
Angelique